Getting Started with Adobe Fireworks
Fireworks can be a daunting tool at first glance. Since it is a professional application, there are many windows and many different things you can do. For our purposes, though, we can make life with Fireworks very simple by ignoring many of the extraneous features and going right to the heart of the matter.
Fireworks is currently in version CS6 or Creative Cloud for both Macintosh and Windows. Its icon appears as a stylized "fw" on a yellow background.
To get started, click the Fireworks icon to open the program with a new blank document window. A page will appear that asks whether you want to Open a Recent Item, Create New or Extend. You will choose Create New to create a new Fireworks graphic. Extend takes you to the Adobe website where you can download plugins and other resources for use with the Fireworks program. (Note: If a new document does not appear for you, click the File menu, then click New. At the next screen, choose the preset options as your starting point.)
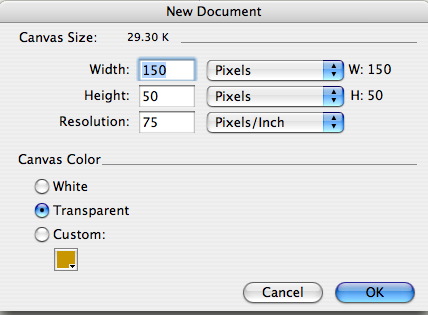
Creating a new document allows you to assign your canvas' initial width and height, and the color. Selecting "Transparent" will allow you to create shapes without a white or colored background, provided you are creating a GIF or PNG file (JPG does not support transparency). The below figures show a typical configuration for a small rectangular graphic, such as a button.
Fireworks creates a Portable Network Graphic or PNG document by default. You may also export these files as JPEG, GIF, animated GIF, TIFF, and BMP. The PNG file is always preserved so you may edit it later.
Onscreen Windows
When you launch Fireworks and start either an existing or new document, several windows will populate the screen. The following list will introduce you to the various windows and their purposes.
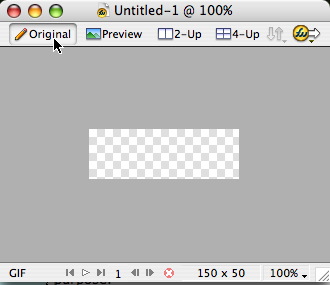
The Canvas
The canvas is your drawing space. This is where you will do your work.
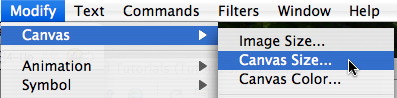
You may select the properties of the canvas when you open the new document (as shown above), but if you need to resize your canvas later, you have two options. In the Properties window, you may modify the canvas by clicking the Canvas button. (Note: If your Properties window is not open, make it visible by selecting Properties from the Window Menu).

Or, you may click the Modify menu, then drag to Canvas and select Canvas Size.
From the Window Menu, you may choose to display an array of different windows with useful tools, which are explained in brief below. For many users, the most important windows to have open during general use include the Properties, Layers, Tools, and Optimize windows.
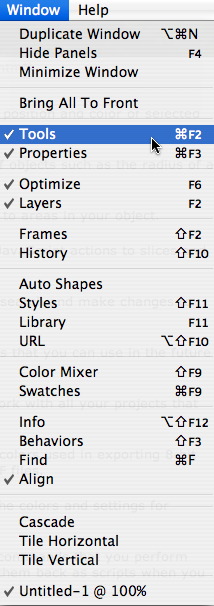 |
Tools Window: This the where the majority of the tools for creatings your graphics are found. When you select a particular tool, this window shows the options you have when working with this tool. The Tools Window is organized into 6 categories: Select, Bitmap, Vector, Web, Colors and View. Properties Windows: Allows you to modify and investigate the characteristics of any selected item in your canvas, including the canvas itself. Optimize Window: Allows you to set the properties of your graphic for exporting as a GIF, Animated GIF, JPG, TIFF, PNG, or BMP file. Layers Window: This window controls the order in which objects appear on the screen. Frames Window: This window controls the elements used for creating rollovers and animations. History Window: This window records the actions and commands that you perform while working in a particular project. You can also play them back as scripts when you want to perform the same actions again. Auto Shapes Window: A variety of pre-drawn shapes can be added to your documents from this window. Styles Window: This window allows you to create styles that you can use in the future without having to reformat each time. Library Window: The library houses items that you define as graphic, button and animation symbols. From the library, you can drag items onto your pages. URL Window: This window allows you to add web links to areas in your object. Color Mixer Window: This window allows you to define the colors you will be using. Swatches Window: This window lets you store a preset group of colors. Info Window: This window gives information about the position and color of selected objects. Behaviors Window: This window allows you to assign JavaScript actions to slices and image maps. Find Window: This window allows you to search and make changes to images in one document or many documents. Align Window: Provides tools for ordering and aligning objects on your canvas. |
The Tools Window
The Tools window is where the most important creation and modification tools will be found. Below is a brief description of each tool in order from upper left to lower right. When you choose a tool, the Properties window displays tool options. Some tool options remain displayed as you work with the tool. For other tools, such as the basic shape, Pen, and Line tools, the Property inspector displays the properties of selected objects. Click and hold the mouse on any tool with an arrow in its icon to see additional options for that tool.
 |
Selecting ObjectsThe Pointer tool selects objects when you click the objects or drag a selection area around them. The Subselection tool selects an individual object in a group or the points of a vector object. The Select Behind tool selects an object that is behind another object. The Export Area tool selects an area to be exported as a separate file. Bitmap Modification ToolsThe Marquee tool allows you to select portions of the screen in the shape of a rectangle or oval. Click and drag over the image to draw the marquee shape. You may then modify the color or delete the area (press Backspace or Delete on your keyboard) as needed. The Lasso tool also allows you to select portions of the image, but they can be in any shape you desire. Click and drag around to create your shape. You may then modify the color or delete the area (press Backspace or Delete on your keyboard) as needed. The Magic Wand tool can select areas of the image, much like the Marquee and Lasso, except it can automatically determine the area you want to select based on shape and color. It is excellent for selecting unusually-shaped areas. You may then modify the color or delete the area (press Backspace or Delete on your keyboard) as needed. The Paintbrush allows you to freely draw with thick or thin paintbrush-like strokes. The Pencil allows you to draw freely using thin lines. The Eraser erases pixels in your canvas. Click and drag to start erasing. The Blur tool allows you to blur, sharpen, or create color effects on your image by clicking and dragging on the spots you wish to modify. The Rubber Stamp tool allows you to click on an area in your image to "pick it up," and then click elsewhere to repeat or "stamp" it as many times as you like. The Eyedropper allows you to "pick up" any color on your screen to use as your primary color. The Paintbucket drops the currently selected color into any space on the canvas when you click. Vector Modification ToolsThe Line tool draws perfectly straight lines. The Pen tool draws straight or curved lines using algorithms that you can easily specify in the Properties window. The Shapes tool can draw rectangles, circles, and an array of polygons and pre-drawn shapes. The Font tool allows you to type text into your graphic. The Freeform tools can bend or stretch shapes created with the Pen tool. The Knife tool allows you to slice a vector shape created with the Pen or Line tools into two or more paths. Web ToolsThe Hotspot tool allows you to define areas of the image that are "hotspots" and can be clicked on to take the user elsewhere (as in image maps). The Slice tool allows you to create some basic Web button functions using simple, easy-to-undestand Javascripts known as Behaviors. You do not need to know any code to create these. The Show and Hide Hotspots and Slices buttons either show or hide the areas in your image where hotspots and slices have been added. ColorsThe top color well changes the colors of drawn or selected lines (stroke). The bottom color well changes the colors of drawn or selected shapes (fill). You can also swap these colors or eliminate them using the small tools below the color wells. ViewThe view tools allow you to toggle between normal and full screen modes, as well as Zoom in and out and drag to different areas in a large document that does not fit completely on your screen. |
About Vector and Bitmap Graphics
Images are composed of elements called bitmaps or vectors. A vector object is a mathematical description of a geometric form. The advantage of a vector object is that the image does not lose quality when you make them larger or smaller. A bitmap image is a grid of colored dots or pixels. The dots form pictures much like a mosaic. However, as you increase or decrease the size of the image, the pixels either spread out or clump closer together. This affects the image quality.