Action Buttons
- PowerPoint Basics
- Presentation Designs
- Custom Presentations
- Adding Slides and Layouts
- Clipart
- Multimedia
- Charts and Tables
- Slideshow Animations
- Action Buttons
- Viewing the Finished Show
- Tips for Effective Presentations
PowerPoint presentations do not have to be linear (i.e., move from one slide to the next in order). In fact, you can create a complete multimedia experience using PowerPoint if you so desire. Moving between different slides in a presentation, opening Internet addresses, and opening other documents can all be achieved through the use of Action Buttons.
To create an Action Button:
1. Click the Slide Show menu, drag down to Action Buttons, then choose the desired button type. Choose Custom if you wish to have a blank button.

2. Click anywhere on your slide to place the button.

You may also apply Actions to any other graphic or object in your slide.
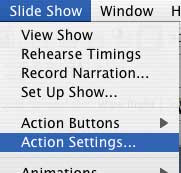
1. Click on the object to which you will apply the Action. Then, click the Slide Show menu and choose Action Settings.

Regardless if you create an Action Button or apply an action to another object, you will be taken to the Action Settings window.
1. The Action Settings Window contains options for clicking or dragging the mouse cursor over objects during your slide show. The exact same options can be applied to either instance.

2. To make a button or object go to a particular slide, document, or Internet address when clicked or moused over, click the button next to "Hyperlink to," then make your selection from the popup menu as shown.

3. Note that you may also apply sounds to actions, and you can even have PowerPoint open other programs for you. Experiment with Action Settings to see what options are right for you in your presentation.
