Simple Interactions - Introduction to ActionScript 2
- Understanding Flash
- Built-in Templates
- Simple Tweening
- Advanced Tweening
- Essential Interactions
- Converting Video to Flash
- Quizzes and User Input
- QuickTip Interactions
- Drag and Drop Interactions
This is a short primer to creating simple interactions with Flash, using the ActionScript 2.0 programming language. As you may have seen in the other Flash tutorials on this site, Flash animations are composed of symbols, which are arranged on a timeline, often in multiple layers, and each of these symbols and layers have names to tell them apart. Naming symbols is important in Flash development, as ActionScript uses these names to tell symbols apart, and without descriptive names, you run the risk of forgetting what symbol is what in your animation.
To create a button that takes us to a URL as part of a Flash animation (perhaps, say, as part of an introduction to a website or as part of a Flash-based navigation bar), we will follow these basic steps. Note these steps can be repeated for creating additional buttons in your animation, using the names of your new buttons in place of the names we are using here.
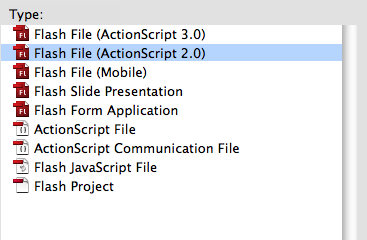
1. We will start with a new, blank document. It's important when preparing to add ActionScript to a Flash document that you choose the correct type of file for the script language you will be using. If you select ActionScript 2 you will be able to write script based in ActionScript 2.0 only, while if you choose ActionScript 3.0, you will be able to only write in ActionScript 3.0, which is a much different, more powerful, and far more complex language than version 2. It is based on Javascript and object-oriented programming, and as a result, is not quite as easy to jump into for a novice programmer.
Note, however, that Actionscript 2 is considered deprecated (old) and is no longer supported in the very newest version of the Adobe suite, Adobe CC. While it is still a good thing to "cut one's teeth on" Adobe doesn't necessarily agree. A good primer for getting started with AS3 can be found at http://www.senocular.com/flash/tutorials/as3withflashcs3/.
Creating an Interactive Button in Flash (Actionscript 2)
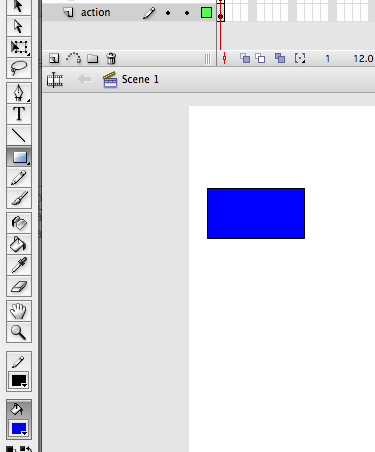
2. Once you have your new ActionScript 2.0 document, use the New Layer button in the bottom left-hand corner of the timeline to create two layers in your document, one called "button" and one called "action".
![]()

2. Now, click on Frame 1 of the button layer and draw a shape, such as a rectangle, using the drawing tools.
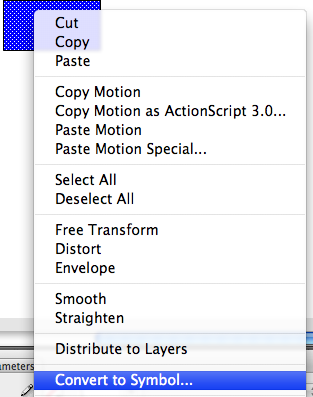
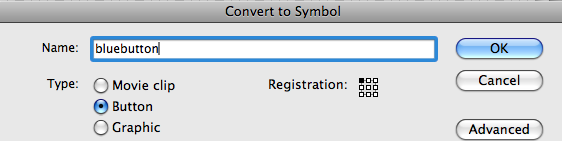
3. Once you are satisfied with your button, right-click (or Control-click) on it to Convert it to a Symbol. You will want to change it to a button symbol - the name can be anything you like.
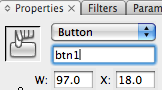
4. Once you have changed the shape into a symbol, you must name this instance of that symbol by changing its name in the Properties window. Again, the name can match mine, or be anything you like. However, avoid the use of spaces or non-text characters other than underscores, numbers, or dashes, in your naming.
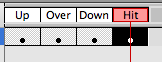
5. Each button has four states in Flash - the up, over, down, and Hit states. These define how the button looks when it is being clicked, as well as what the clickable area of the button actually is. To set these states, use the Black Pointer tool and double-click on the button to go to its timeline.
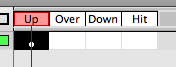
6. Set the Over, Down, and Hit states by inserting a keyframe at each point. You will know you've gotten each state if they all have a black circle beneath them.
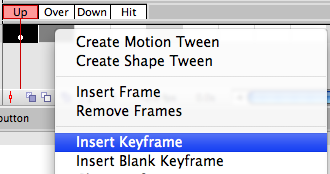
7. At each of these keyframes, you have the option to change the button image in any way you wish. For example, if you wish to make it change color when it is clicked, use the Black Pointer to select it and change its properties accordingly. Also, if you wish to alter the clickable area of the button, draw another circle or triangle over it in the Hit frame. This shape will not appear anywhere in your document, except to show you where the Hit state's clickable area is. When you are finished setting your button states, return to the main timeline by clicking Scene 1.
![]()
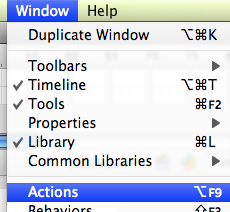
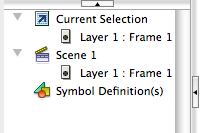
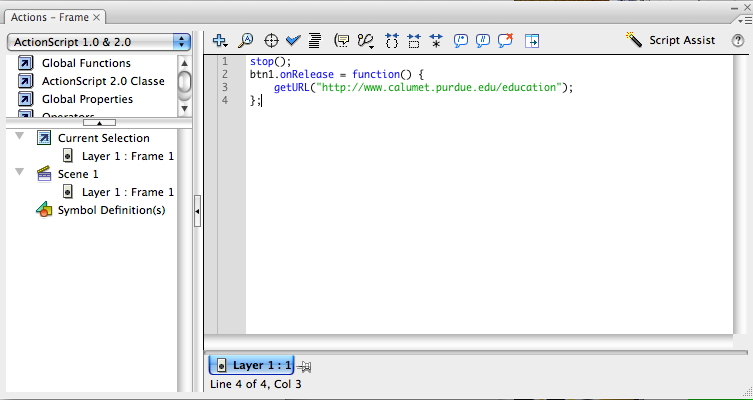
8. Now, you can go to Frame 1 of the actions layer and bring up the Actions window from the Window menu. This window is where you can enter your ActionScript to activate the button. When the Actions window comes up, be sure that your Current Selection (lower left-hand quadrant of window) shows "Layer 1: Frame 1", and not something else.
9. You can now enter the following ActionScript 2 code into your Actions window. The first line, stop();, tells the animation to pause and wait for a user command. The next lines describe how btn1 will function - in this case, when the mouse button is released on btn1 (it could easily say onClick instead), the button will go to the URL defined.
Using ActionScript 2 for basic purposes such as these are much simpler for people who are not programmers to understand, and it is recommended that you stick with ActionScript 2, even if you are using version CS3, if you only plan on making simple interactions like this one.
NOTE: You can use other simple commands in place of "getURL()" as you see it below, including gotoAndStop or gotoAndPlay to go to another frame number within the Flash document; i.e., "gotoAndPlay(1)". Turning on the ScriptAssist function by clicking the ScriptAssist button while working in the Actions window will help you use the correct syntax when writing script commands.
Also note that syntax in punctuation and capitalization is very important in Flash ActionScript, so ensure that your syntax is exact. Matching the code given in this, or any, tutorial exactly, including the { and }; symbols that appear at the beginning and end of commands, is very important and will ensure that the code performs as expected.
An ActionScript 3 Version of this code might look like:
import flash.events.MouseEvent;

    import flash.net.URLRequest;
  button1.addEventListener(MouseEvent.CLICK, clicked);


  function clicked(e:MouseEvent):void {

    navigateToURL(new URLRequest("http://www.schoolofflash.com"),"_self");

    }
Note that this code and the AS2 example above show movement to a URL. AS2 code for movement to a new frame would be:
gotoAndStop("2")
Instead of gotoURL. An example of an AS3 button to go to another frame can be found at http://flashthusiast.com/2008/07/31/creating-buttons-that-link-to-different-scenes-using-actionscript-30/.
ActionScript 3 Version
Want the AS3 version of the above tutorial? Check out http://www.schoolofflash.com/2011/04/tutorial-actionscript-3-buttons/ which is a great primer creating a similar button interaction.
Another good one is http://flashthusiast.com/2008/07/31/creating-buttons-that-link-to-different-scenes-using-actionscript-30/ which will also show you how to move from one frame to the next in AS3.
ActionScript Resources
ActionScript is not among the easiest code languages to learn, and especially where ActionScript 3 is concerned, learning it can prove a daunting task for Flash novices. However, there are many excellent books and tutorials available to help you get a better handle on Flash ActionScript, including these recommended resources:
- Flash Game University, with a great "Ask the Author" section: http://flashgameu.com/
- ActionScript.org, with a collection of both beginning and advanced tutorials on all kinds of ActionScript topics: http://www.actionscript.org/resources/categories/Tutorials/
- GotoAndPlay, a nice site with lots of Flash resources: http://www.gotoandplay.it/
- Flash and Math, a great site with example scripts and tutorials for creating advanced mathematic functions using ActionScript 3: http://www.flashandmath.com
- Flashkit.com, featuring tutorials as well as downloadable media you can use in your animations or websites: http://www.flashkit.com
- FlashTutorials.us collects Flash tutorials of interest from other sites and aggregates them into one place: http://www.flashtutorials.us/
- AtomicLearning, a subscription-based site with video and audio tutorials on a large number of products, including Flash, other software titles, and technology of interest specifically to educators: http://www.atomiclearning.com
- Lynda.com, another subscription-based site that allows you to download multitudes of video tutorials on a wide array of technology subjects, including Flash and other Adobe products. Lynda.com also publishes printed books based on their video tutorials that are often highly recommended by those who have used them. http://www.lynda.com/